GeForce 256 Tweak Guide
Posted: March 7, 2000
Written by: Dan "Tweak Monkey" Kennedy
Note - Most of these tweaks work with TNT/TNT2 cards as well!
Introduction
I was reminiscing while trying to think of what to say here, when the whole Nvidia experience popped into my head. When I went to Nvidia's headquarters in Santa Clara during the summer to see the GeForce 256 in action (with some other webmasters), I knew the product was going to be big. Why else would Nvidia fly us out there just to see it before anyone else? I still remember talking about the product the night before, as we all hiked to Denny's, which was the only place open at 3 AM within walking distance of the hotel we were staying at. Everyone pitched in their ideas on the GeForce, and when it came to me, all I could say was "I can't wait to overclock it!" -- hey, I'm a tweaker at heart. All I could think about was making the fastest video card on the market even faster.
The next day, at about 8 AM, we were in the presence of Derek Perez and some other Nvidia "big names" including Jen-Hsun Huang (the CEO), Michael Hara (vice president of marketing), and Doug Kennedy (marketing manager). After being briefed with the specifications of the GeForce 256, the first question I asked Jen-Hsun was "Can we overclock the GeForce 256?". He responded by telling us a story of how even he, the CEO, overclocked his TNT2 Ultra at home. I think he even said something about a peltier on there!
Anyway, the point of this boring story wasn't to put you to sleep, but rather to demonstrate that everyone, including CEOs of companies, want the best performance and highest speed with their PCs, even if it goes beyond their own recommended specifications. This guide was written to help you ensure compatibility, optimize performance and visual quality with GeForce 256 video cards, in both SDR and DDR varieties.
Here's what this guide contains:
-General BIOS Settings and AGP aperture size
-Super-7 BIOS Settings
-AGP bus speed
-Super-7 compatibility issues
-Removing old drivers and installing new drivers
-More Super-7/Athlon fixes
-Display settings tweaks
-Direct3D/OpenGL tweaks
-Overclocking
-Cooling
This guide was originally written January 17, 2000.
The March 7, 2000 update includes:
-Updated AGP bus speed info
-More registry tweaks
-More Super-7/Athlon fixes
-Updated OpenGL performance tweaks
-Updated cooling section
-Included .reg files for all the registry tweaks to make things easier/faster
BIOS Settings
If you've read many Tweak3D tweak guides in the past, you know we take things one step at a time. With the GeForce 256, the first step after physical installation (if you had problems with this, go here) is to setup your BIOS for compatibility / performance.
Rather than a loaded 800 MHz system, we used the medium-powered testbed to test these settings (to see if the tweaks helped significantly):
Pentium II 450 MHz CPU
Abit BX6 motherboard
128 MB SDRAM
Nvidia GeForce 256 DDR reference board
Sound Blaster Live
Windows 98
Vsync disabled
Quake3 Arena, Demo1 (to compare performance)
You'll need to restart your computer, and hit either Delete or F10 (or the key that is denoted on your screen) to enter your BIOS setup. If you've never seen your BIOS before, take a moment to explore it (not changing anything) before continuing. This will help you become familiar with changing the settings discussed herein. Some BIOSes may not let you change some of the following options, but if you'd like to be able to play with them anyway, the program TweakBIOS will serve you well. Unfortunately, the program will not save your settings for you unless you buy the program. Therefore, you'll have to reapply them every time you restart.
Generally, if you have no major problems, these settings should be fine. But if you run into problems, adjusting these BIOS settings may help you. It is recommended that you adjust only a few settings at a time, rather than all of them at once. (Write down the original value for any settings you change first!)
These are the settings Tweak3D recommends:
Assign IRQ to VGA (or video) - Enabled or set to "Auto". The GeForce 256 requires an IRQ to operate.
Video BIOS cacheable - Disabled or default. This may cause problems if enabled, and it did not boost performance in our tests.
Video BIOS shadow - Disabled. This may cause problems if enabled, and it did not boost performance in our tests.
VGA Palette Snoop - Disabled. This is an old feature that is not required by the GeForce 256.
PCI Palette Snoop - Disabled. This is somewhat like the feature above. It should not be enabled for the GeForce 256.
C8xxxx-CBxxxx Shadow (where xxxx is any hex #) - Disabled. The GeForce 256 is already shadowed. These can cause problems if enabled.
AGP Aperture size - The AGP Aperture size is the total amount of system memory available to an AGP video card (beyond the card's "local" memory). If your system frequently crashes, set it to 64 MB. If that doesn't help, set it to 256 MB or the default value, regardless of the amount of memory in your system. The test system had 128 MB of RAM and 32 worked perfectly.
If you have:
- 128+ MB ram: Set to 64 MB or 32 MB
- 96 MB ram: Set to 48 MB or 24 MB
- 64 MB ram: Set to 32 MB or 16 MB
- 48 MB ram: Set to 24 MB or 12 MB
- 32 MB ram: Set to 24 MB or 12 MB
- 16 MB ram: Set to 24 MB or 12 MB
Super-7 BIOS settings
With Super socket-7 and possibly Athlon systems, a few settings can cause problems, so disabling them can help stability. Most of the troublesome settings are usually disabled by default, but programs such as PowerTweak can sometimes turn them on. Be careful to check that these are indeed set properly. Remember that the names of the settings you see here may differ from those in your particular BIOS. Just look for settings that are similar in name.
Read around Write - This can cause lock-ups. If you can get away with enabling it, it can increase performance. Try enabling it, and if you experience problems, disable it.
Cache Pipeline Writes - This causes lock-ups in most systems, using GeForce 256 cards, especially MVP3 boards. Disable this setting.
Cache Pipeline Reads - This can cause problems, but generally is harmless if left on. On MVP3 boards, it is best to leave this setting enabled.
AGP Bus Speed
A commonly encountered problem, especially when overclocking a CPU, is an incorrectly set AGP-to-system bus ratio. For example, if you set the front side bus speed from 66MHz to 100 MHz, and if the ratio is not changed from 1/1 to 2/3, the AGP bus will also run at 100MHz. This will in no way benefit your speed (most likely), and can even cause problems and/or damage your card. In a nutshell:
| Bus Speed | AGP Multiplier | AGP speed |
| 66 MHz | 1/1 | 66 MHz |
| 75 MHz | 1/1* | 75 MHz |
| 83 MHz | 1/1** (2/3 recommended) | 83 MHz (if 2/3, 55 MHz) |
| 100 MHz | 2/3 | 66 MHz |
| 112 MHz | 2/3* | 75 MHz |
| 124 MHz | 2/3** | 83 MHz |
| 133 MHz | 2/3*** | 89 MHz |
* This speed is higher than that which the product is designed for. Problems may occur. Try not to use speeds higher than this.
** This speed is much higher than that which the product is designed for. Problems may occur. The lifetime of the card will be significantly lowered. Using a faster bus speed/ratio may "kill" the card.
*** This speed is dangerously higher than that which the product is designed for. Problems may occur. The lifetime of the card will be significantly lowered. This is taking a huge risk and is highly discouraged.
To find your AGP speed, multiply your system bus speed (i.e. - 100MHz) by the AGP/CPU ratio (e.g. - 2/3). For more information, read the AGP and/or CPU configuration section of your motherboard's manual. If you MUST set the AGP bus speed higher than 66 MHz, remember: You have been warned.
There are always exceptions to what we recommend. We can only test these settings on so many systems. However, for the most part, try to avoid higher bus speeds with AGP cards.
Super-7 Compatibility Issues
There were many problems between the TNT and Super 7 systems in the past. Most of the issues have since been addressed with the new versions of the Nvidia reference drivers. There are still, however, occasionally problems, most of them related to the ALi Aladdin V motherboard chipset.
AGP Drivers
The #1 issue with most SS7 systems and Nvidia chips are poorly implemented AGP drivers. With the recent patches and drivers available for the VIA MVP3 chipset, the board should function perfectly. ALi's 1.60 and later AGP drivers have also fixed masses of issues, making it a more stable platform.
For VIA-based SS7 boards:
VIA Driver Page
For ALi-based SS7 boards:
ALi Driver Page
One reader (sorry, I can't find the name) wrote in with this after the original GeForce guide was posted:
ALI recently released an AGP utility to allow full control of all AGP
settings on ALI Super 7 boards. This allows the AGP and GAT Modes to be
set to 1. The athlon drivers would not fix my Geforce problem but doing
this did. It also allowed me to enable AGP support on a TNT2 cards which
previously would freeze if AGP was enabled.
Cleaning Out Old Drivers and Installing New Drivers
Start out by checking the video card manufacturer's web site for driver updates (e.g. Creative Labs). You can find the URL of your manufacturer's web site in the manual.
If the latest drivers are more than a couple of months old, we strongly recommend that you download the latest Nvidia reference drivers here, instead. We always recommend reference drivers because the core is usually the newest the best. However, sometimes manufacturers do put forth an extra effort to post new drivers and include special utilities. Also note that you may need the manufacturer's drivers to support extra features of your video card like TV-output.
The process that we recommend following to clean out old drivers is a long and somewhat complicated one, but it's worth it. When installing your drivers, it is best to do a proper install, which involves switching to a standard display type, purging your system of any old drivers, and installing the new drivers. Read and follow the steps carefully.
Step One
- Right click your desktop
- Choose Properties
- Choose Settings
- Choose Advanced
- Choose Adapter
- Click Change
Here you'll be presented with a couple of options. Choose to display a list of drivers. In the left pane, scroll all the way to the top and choose (Standard display types). Then, in the right pane, choose Standard PCI Graphics Adapter (VGA). Follow the prompts, and reboot.
Step Two
The second step before installing the new drivers is making certain that there's no driver "residue" left behind from previous driver installs. If you're upgrading from a previous set of Nvidia reference drivers, do the following:
- Click the Start button and select Find, and then Files and Folders...
- Make sure the Find applet is set to search your C:\ drive and do a search for "nv*.*" - without the quotes
- Look for any files found in the C:\Windows\System and C:\Windows\Inf and C:\Windows\Help
- Select these files and delete them (do NOT empty them from the Recycle Bin until you know your upgrade has been a success)
- Exit the Find applet
- Click the Start button and select Run
- In the Run box, type regedit; this will open the Windows Registry Editor
- In the left-hand pane, navigate to the key HKEY_LOCAL_MACHINE\Software\NVIDIA Corporation
- Right-click on the Nvidia Corporation key in the left-pane, select Delete, and click Yes to confirm the deletion
- Exit Regedit and hit the F5 key to refresh the registry
If you're upgrading to Nvidia reference drivers from a manufacturer's proprietary drivers, you have two options. The first option is using an uninstall utility that may or may not have come with your video card. If there is such a utility, you'll find it in the Add/Remove Programs applet in the Control Panel. There may also be such a utility on the drivers CD that came with the card. If you have an uninstall applet, use it. If not, you'll have to take a different approach to "uninstalling" the old drivers. This is where System Info comes in. It's a handy little applet in Windows that displays information about installed components, drivers, resources, etc.. To use it, do the following:
- Click the Start button and select Run
- In the Run box, type msinfo32
- Once System Information opens, click on Components and then Display (in the left-hand pane)
In the right-hand pane, System Info will display a list of information about the display drivers that are CURRENTLY INSTALLED. Each file has a Company Name entry, which you need to pay attention to. If a file's Company Name is either Intel Corporation or Microsoft Corporation, forget that you ever saw it. As for the rest of the files listed, write down the name of each one. Do a Find for these files as outlined in step two (above), deleting each file as you go.
Next, from the System Information utility, select System Configuration Utility from the Tools menu, and select the Startup tab. Look through the list for anything related to your old drivers. For example, when removing Creative Labs' drivers, you may find something that refers to a "Blaster Control," such as bcontrol.exe or blasterc.exe. Uncheck these items, and close the utilities. (If you're prompted to restart, it is recommended that you do so.)
Step Three
Now to install the new drivers.... Make sure you have extracted the .zip containing the driver files to an easy-to-find location. Once you've done so:
(The following pertains only to Nvidia reference drivers, and may not work properly with non-Nvidia drivers.)
- Right-click the desktop and select Properties
- Click the Settings tab, and click the Advanced button
- Click the Adapter tab, and click the Change button
- Click Next, in the update Device Driver Wizard
- Select the radio button for Display a list of all the drivers in a specific location...
- Click the Next button and click the Have Disk button
- In the Install From Disk box, click the Browse button, and point Windows to where you extracted the new driver files
- Click Okay, then Okay again, and in the Select Device window, select GeForce 256.
- Click Okay, and then click Next
- Let Windows install the new drivers, and click Finish
- Click Okay, Apply, and Okay
- When prompted to restart your computer, do so
Super-7 /Athlon Registry Fix
Note - this tweak was changed completely since the article was posted. Thanks Chris for the info!
1. Install ANY Nvidia reference driver
2. Run Regedit (Start, run, regedit)
3. Go to HKEY_LOCAL_MACHINE\Software\NVIDIA Corporation\Global\System
4. Create a new Binary value of 4 bytes
5. Name it Super7Compat
6. Change the value to 00 00 00 00 and it should fix some problems.
Alternatively, you can download and run this .reg file and run it, and choose Yes. This will perform steps 1-6 automatically.
Registry Tweaks!
Before you mess around with these settings, a tweak should be applied that will enable all of the hidden options in the tweaking program. I didn't need to edit this value, but some people will probably need to. Open up regedit (Start, run, regedit), and navigate to HKEY_LOCAL_MACHINE\Software\NVIDIA Corporation\Global\NVTweak. Create a DWORD value called "CoolBits" and set its value to 3. Or you can download this file and run it. Double click the file and choose "Yes".
New Registry Tweaks
The following are the tweaks that were discovered since the original posting of this guide (thanks Nvidia!):
"EnableIrongate2x" - This registry string should enable AGP2X mode for AMD Athlon systems. If it works, this should increase performance. If it doesn't work, it may cause problems. The exact string for this value is:
[HKEY_LOCAL_MACHINE\Software\NVIDIA Corporation\Global\System]
"EnableIrongate2x"=dword:00000001
Either enter this string manually, or download this .reg file and run it. If you want to undo the settings, either download this file and run it, or delete the DWORD value specified above.
"ReqAGPFW" - This registry string should enable AGP Fast Writes. Fast Writes allow data to be transferred over the AGP bus with almost no latency, avoiding the system memory by sending data directly do the GeForce from the CPU (see page 8 of the GeForce 256 Preview for diagrams and info). However, this has yet to be used successfully by most people. If you want to try to use it, here's the value:
[HKEY_LOCAL_MACHINE\Software\NVIDIA Corporation\Global\System]
"ReqAGPFW"=dword:00000001
Enter this string manually, or download this .reg file and run it. If you want to undo the settings, either download this file and run it, or delete the DWORD value specified above.
"DoIOToFlushCache" - According to a Kevin Harris (thanks Kevin!), this will turn on the option to disable VSYNC. Since this is already part of the Nvidia display settings (or at least, it should be), you probably don't need it. If you do want to use it, here's the full string:
[HKEY_LOCAL_MACHINE\Software\NVIDIA Corporation\Global\System]
"DoIOToFlushCache"=dword:00000001
Download a .reg file here to enable it, or a .reg file here to disable it.
"ReqAGPRate" - To be honest, I still don't know what this does. "AGP rate" is what it looks like, but honestly, I couldn't find a practical purpose for this string. I tried it on my Pentium II system but I saw no improvements. Here's the full string:
[HKEY_LOCAL_MACHINE\Software\NVIDIA Corporation\Global\System]
"ReqAGPRate"=dword:00000001
Download a .reg file here to enable it or here to disable it.
"EnableIrongateSBA" - One other setting that recieved a lot of attention is EnableIrongateSBA. As the name suggests, this enables Irongate Sideband Addressing. As with the other "Irongate" setting, this appears to only work with Athlon systems. A lot of readers let me know that this tweak also only works with reference drivers v3.69+. Enable this setting for performance. It may possibly lead to problems, though. Here's the full string:
[HKEY_LOCAL_MACHINE\Software\NVIDIA Corporation\Global\System]
"EnableIrongateSBA"=dword:00000001
Download a .reg file here to enable, or download this .reg file to undo it if you have problems.
Remember, if any of the settings above give you problems, you can simply run the undo file or delete the DWORD value(s). Use the tweaks ONE AT A TIME (and test with games after each tweak) to avoid complications.
Display Settings
To access the display settings tweaks, right click your desktop and choose Properties. Click the Settings tab at the top, then the Advanced button. Click the GeForce tab at the top. It should display information about your video card.
Click Additional Properties at the bottom. It will bring up a menu with several tabs that are all for tweakers.
Color correction and brightness
You should probably start in the Color Correction tab. If you've got problems with games or your desktop being too bright/dark, adjust these values. You can apply more color/brightness tweaks in the Overlay Color Control tab.
Direct3D Settings
Next, head over to the Direct3D tab. Keep in mind that most non-first person shooter games use Direct3D, so these settings will directly affect all of them.
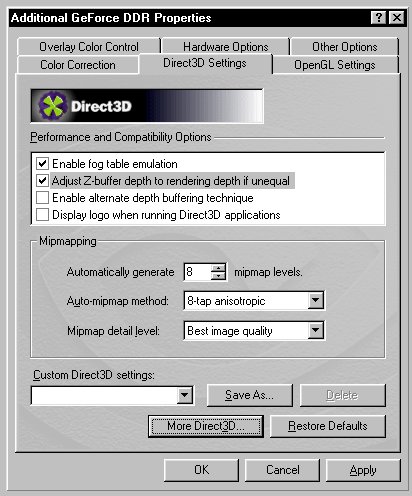
Enable fog table emulation - Since some games that don't use Direct3D's fog correctly, this option should be enabled for compatibility. It won't affect performance much, if at all.
Adjust Z-Buffer depth to rendering depth if unequal - This won't matter much but should probably be left enabled.
Enable alternate depth buffering technique - This will improve the quality of 16-bit 3D rendering, but it will slow things down. Our tests showed some slow downs in Direct3D without any significant image quality improvements. This is best left disabled.
Display Logo when running Direct3D applications - There is no practical reason to enable this, unless you actually want to see the Nvidia logo in the corner of the screen when running Direct3D games, etc. Note that even if this is enabled, games can override this feature.
Automatically generate x mipmap levels - This value can be set from 0 to 12, and it's best to leave it high unless you experience problems with Direct3D games. Mipmaps increase the efficiency of texture transfers across the bus. I set it to 0 if I see problems in a game, but usually I keep this at 8.
Auto-mipmap method - If you have the mipmap levels set to 0, this is irrelevent, but if you are using mipmaps, this can boost speed or visuals. Bilinear filtering looks pretty good and it runs quite a bit faster than 8-tap anisotropic filtering. Overall, anistropic filtering can provide much more smooth filtering. Only use anisotropic if you have extra performance to spare (which with the GeForce 256, is probably the case). Keep in mind this is ONLY for Direct3D, so it won't affect Quake 3 Arena or other OpenGL games.
Mipmap detail level - This option obviously lets you choose the detail of the mipmaps mentioned above. Five options are available, each of which sacrifices either image quality for performance or vice-versa. I recommend using "Best image quality" with the GeForce 256 unless you have a slow CPU (less than 233 MHz).
Click More Direct3D at the bottom to access more features.
Texel Alignment - Leave this feature alone. The GeForce 256 is extremely accurate and therefore you probably won't see many seams in textures. If you do, it's probably the fault of the software. Adjusting this value may drop the frame rate significantly.
PCI Texture Memory Size - Set this to 0, since the GeForce 256 is AGP only at this time (PCI should be coming soon!). Exceptions? Your GeForce should be running in pure AGP GC-MMP AGP Pipelining Mode rather than GC-MMF AGP Frame Mode. If the performance is poor with PCI Texture Memory Size set to 0, consider upgrading your drivers or set this value higher. Thanks Heat for the info.
Disable vertical sync (VSYNC) - If you check this box and disable VSYNC, games will run a bit faster because the frame rate won't be limited to the refresh rate. However, this also can lead to tearing due to the lack of synchronization. It's usually okay to check this box. Set the frames ahead to 5 to start (which I believe is default). If the input (mouse or keyboard, etc.) of games tends to lag, lower this value.
More Display Settings Tweaks - OpenGL Settings
Now, head over to the OpenGL settings. Remember that these will work for most first person shooters like Quake 2, Quake 3, or Half-Life and that these will also work if you're using your GeForce 256 for 3D modeling programs like 3D Studio Max or Lightwave.
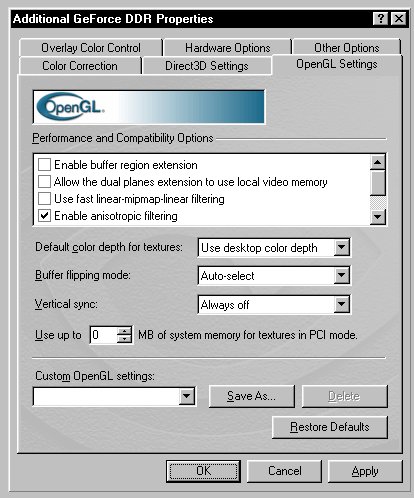
Enable buffer region extension - This doesn't apply to most games, but it does apply to 3D modeling programs. If the program uses the GL_KTX_buffer_region GL extention, enabling this will speed it up. So, if you use 3D modeling programs, enable this feature. Otherwise, leave it alone.
Allow the dual planes extension to use local video memory - If you enable the option above, enable this too to gain even more performance in 3D modeling programs. Leave it disabled if you didn't enable the option above.
Use fast linear-mipmap-linear filtering - This option will speed up OpenGL performance at a slight cost of image quality. For the most part, the games will look almost the same. Distant filtered objects may appear less detailed. Enable it if you're looking for performance, or leave it alone if all you want is image quality.
Enable anisotropic filtering - Enable this for a nice increase in visual quality. If a game supports anisotropic filtering, this feature will add a fine and accurate filter to textures, such as the distant floors in a first person shooter. However, if you enable this you may lose performance.
Enable alternate depth buffering technique - As with Direct3D, this will enable a slower but more detailed buffering technique for 16-bit. In our tests, we did not see any noticeable increases in visual quality, so you should probably leave this alone as well.
Disable support for enhanced CPU instructions sets - For most users, this option should be left unchecked. If you experience problems, try checking this box and see if it fixes your problems.
Default color depth for textures - Most new games can override this setting, but some older games (like Quake 2) cannot. Set this to your preferred color depth for games. Note that 16-bit is about 10%-30% faster on most games.
Buffer flipping mode - Leave this on Auto-select. The auto-select method is nearly 100% accurate, so you shouldn't experience any problems if this setting is left alone.
Vertical sync (VSYNC) - This is the same as with Direct3D, except it's for OpenGL instead. We recommend that you leave it to "Always off". As with the other setting, change it if you experience tearing.
Use up to x MB of system memory for textures in PCI mode - Set this to 0, since the GeForce 256 is AGP only at this time. Your GeForce should be running in pure AGP GC-MMP AGP Pipelining Mode rather than GC-MMF AGP Frame Mode. If the performance is poor with PCI Texture Memory Size set to 0, consider upgrading your drivers or set this value higher. Experiment until you find a sweet spot. Thanks Heat for the info.
Hardware Options
Open up the Hardware Options tab. What's this!? Yep, Nvidia finally included an overclocking utility with its drivers. To adjust the clock speed, you'll need to reboot your computer once you've selected "Allow clock frequency adjustments" the first time. Once you've rebooted, you can now adjust the clock speed and even test it out. Before you go and start playing with this option, read on for more on overclocking and cooling!
Hit "OK" until all the windows have closed down. Now... on to overclocking!
If the Hardware Options tab is not there, follow the coolbits registry tweak on page 4!
Overclocking the GeForce 256
Overclocking is the epitome of tweaking. Nothing can boost performance like overclocking. Keep in mind, overclocking can void your warranty and possibly even kill your video card... but come on! Do you think the average CompUSA customer service rep is going to be able to tell why your video card isn't working when you take it down to return it? (Note - there is an implied statement there, but I'm not going to type it out, for legal reasons). There is definitely a risk involved in overclocking a video card, but it's not as great as manufacturers claim it to be. For more information on safely overclocking a video card, check out our Video Card Overclocking Guide / FAQ.
Before you even touch that GeForce 256's clock speed, make sure it's not already boiling hot. Put your hand next to the card or behind the card immediately after shutting down your PC. If it's already hot, you probably aren't going to get much out of overclocking except for a headache and a lot of lock-ups. So... are you going to chicken out? I didn't think so. :)
To access the Nvidia overclocking utility, right click your desktop, choose Properties, Settings, Advanced, GeForce, Additional Properties, then Hardware Options. If you want to make this easier to access, go to the Other Options tab and choose "Display the QuickTweak icon in the taskbar". Once you're in the Hardware Options tab, you can adjust the clock speed with ease. With my GeForce 256 DDR reference board, the default clock speed is 120 MHz core / 300 MHz memory. With the default cooling, I could reach 135 MHz core / 330 MHz memory. Keep in mind that the GeForce 256 handles 4 pixels per clock, so every MHz is worth 4 pixels/second in fill rate. In other words, 1 MHz with a GeForce 256 goes twice as far as the TNT2 did. This is also a downside, however, because it makes reaching extremely high speeds difficult.
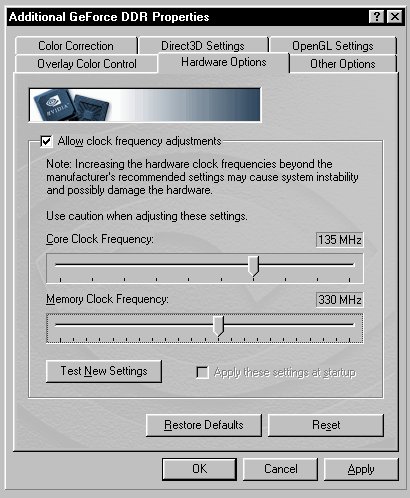
When overclocking, always take up the clock speed by only a few MHz at a time (between 1 and 5) for both memory and core settings. Once you reach a setting that locks up the PC with games, set your final setting a bit lower (until it doesn't lock up, obviously) and check "Apply these settings at startup". If your PC isn't locking up and it isn't way too hot, it should be fine at this speed for years except possibly an occasional lock up.
Cooling the GeForce 256
Now that you've got a clock speed you're sticking with, or maybe a goal for a clock speed you want to reach, you better start thinking of some cooling! My personal favorite all-around cooling solution that absolutely kills most of the competition and won't void your warranty is The Card Cooler. Two 80mm fans braced together for incredible air flow and power, for only $20. They're quiet and won't suck much power either. And wait... if you're not satisfied with two 80mm fans, pick up a 120mm fan! These huge fans move nearly 100 CFM EACH! Or you can buy The Total System Cooling Package for around $50. This is what I recommend for systems without any cooling because it has The Card Cooler, a Super Slot cooler, a 3 fan hard drive cooler, and an extra case fan for kicks. Get all this here at The Card Cooler store.
Even if you don't plan on using The Card Cooler for this, you'll find a practical use later. You'll understand what I mean when I post the article I'm working on which covers some extreme cooling (most of the methods are already in my PC, but I'll leave you without pictures to keep up the suspense).
If you want to see some more extreme cooling, check out the Extreme GeForce Cooling and Overclocking guide. Take a slot cooler, two 120mm fans, and a 215mm Honeywell fan made to cool a small room, and put all of them in direct contact with the GeForce. The result is incredible power and overclocking potential.
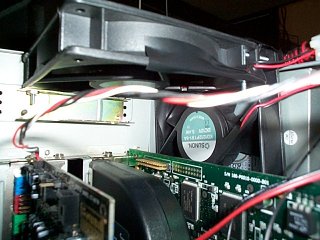
Click to enlarge
Consider customizing your case to optimize heat dissipation. We have some good articles on the topic including the System Cooling/Case Cutting Guide. Enough shameless plugs for now! If you have any unique GeForce cooling ideas, I'd love to hear about them, so please send them in.
Conclusion
Well folks, I've run out of things to say for now. :) I wish you the best of luck in tweaking your TNT/TNT2/GeForce 256 card. If you have problems or questions, try asking for help at the Tweak3D Forum. Stay tuned for updates to this and all of the other guides here at Tweak3D.
Thanks for reading!
Want to return to the normal guide? Click here!
All Content Copyright ©Dan Kennedy; 1999