Quick Fix
Looking for a quick and dirty fix? Here's one tip that Jason Waite sent in - it could be applied in a matter of seconds as a temporary fix. Since the disc is usually out of adjustment, you simply put four 1" pieces of tape (masking or electric) on the disc as follows to balance it - we haven't tested this technique but Jason assures us it can fix issues. It may be worth a try to some:
Disassemble the Playstation 2
- Unplug the power and A/V connector from the back.
- Remove all controllers and memory cards.
- On the rear of the console, cut along the crack of the warning sticker, or remove it entirely.
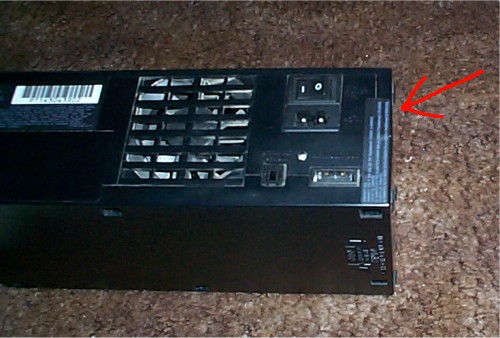
This sticker is cool: it says VOID all over it once removed so it cannot be replaced.
- Turn the unit upside-down and locate the screw covers. These are tiny (1cm x 1cm) squares. Older models have 8. Newer models have 12: 4 are offset on the ridge area toward the front of the console.
The 30001 has 8 of these; the 4 corner covers are rubber.
- Pry these covers out by their corners with a small flathead, knife, or fingernail. Set them aside.
- Remove the 8 or 12 phillips-head screws under the feet.
- Rotate the top cover upward toward the front of the console. BE CAREFUL! If you meet resistence, check that sticker in the back. DO NOT RIP the cable that leads from the cover to the base. If this cable rips, your PS2 is probably as good as dead.
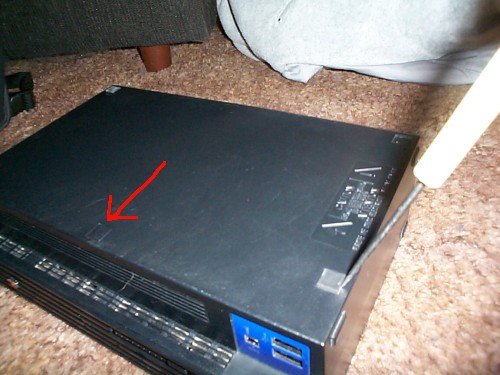
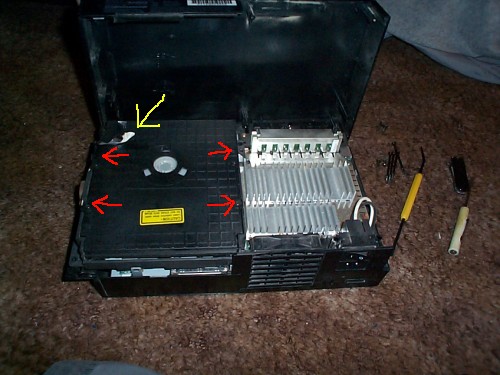
- Remove the tape (yellow arrow in picture below) that holds the cable.
- To completely separate the cover from the base, you need to remove the Power/Eject switch from the cover. To do this, put a flathead screwdriver or knife blade between the plastic switch and the cover (there's a tiny slot where you can fit one), then gently pry upward (away from the cover). Once it pops out of place, slide it toward the back of the cover to remove the switch. This is not necessary, but is recommended to be sure you don't ruin this fragile cable.
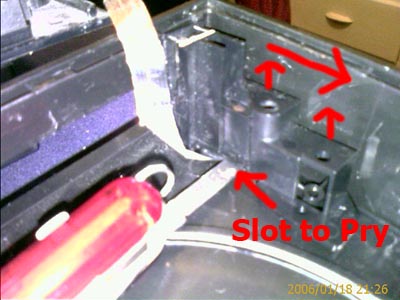
Pop it upward out of place then slide it back.
- Remove the 4 small screws on the disc tray cover (red arrows below) with either a small screwdriver or a knife if you don't have one.
- Lift the disc tray cover off and set it aside. Some models may require additional screws to be removed to remove the disc tray cover.
The disassembly process is now complete. Put all those screws somewhere safe and let's continue.
404 Page Not Found
Page Not Found
We cannot locate the page you're looking for. Please check the address and make sure all letters are lowercased with no spaces.
Clean the Inside
Since you're going to clean the laser lens last, it's probably a good idea to clean all the junk out of the case while it's disassembled. You'll probably find some hair if you have pets, lint, fuzz, and lots of dust inside, depending on the console's age.
Using compressed air preferably, clean out the following areas:
- Cooling fan (at back of the console)
- Controller and memory card slots
- Area around the battery, to the right side of the tray if looking at the front (*** If you remove the battery, you must reset all system settings. If your system is not saving such settings, clean the terminals to the battery with alcohol and scrape them clean. If that fails, replace the battery).
- Under and on all heatsinks
- Top cover of the console on the inside
- Under and over the disc tray
Next you should clean the laser lens.
Clean the Laser Lens
Use a clean Q-tip or cotton swab to clean the laser lens. Dip it in rubbing alcohol (the less water/higher alcohol %, the better) and gently dab it onto the lens. Do this a couple times, or even *very* gently move the swab across the lens. Let it dry for a few minutes before you power on the PS2.

You do not need to open the tray to clean the laser.
Next Page - Lens Angle Adjustment and Testing