|
|
|
|
|
In the Forums... |
Posted: June 11, 2000 Written by: Tuan "Solace" Nguyen Introduction With the arrival of NVIDIA's GeForce 2 GTS, and 3dfx's Voodoo 5, games are going to look much more realistic than ever before. Over in one corner, we have the GeForce 2 with its transform and lighting (T&L) engine doing highly complex geometry details, while in the other corner the Voodoo 5 gives Hollywood effects with motion blur, perspective zoom/focus and full screen anti-aliasing. All these on-board technological advances allow for more complex scenes and models without taxing your CPU. Transform and Lighting allows a developer to increase geometry complexity in a scene whether it be the landscape or the characters. All geometry functions are done in hardware on the GPU. Before, T&L was done in software and was heavy on your local CPU. 3dfx has taken a different approach to screen complexity. They have applied a massive effects engine able to do feature film-like effects. The most talked about feature has to be FSAA (full scene anti-aliasing). This removes the "jaggies" that you see on the edges of objects. Other features include perspective zoom. This is also an effect that is used often in movies. When something important needs to be focused on, the camera focuses sharply on that object or person and everything else seems blurry. There has been another technology that has been around (on PC gaming video cards) for a year or so and it is only beginning to take some real shape now -- bump mapping. Actually there are numerous games out that take advantage of it, but none actually go very far in terms of mass implementation. Bump Mapping Bump mapping is a technique used to add more realism to images without adding a lot of geometry. Texture mapping adds realism by mapping images to geometric surfaces. Bump mapping adds per-pixel surface relief shading, increasing the apparent complexity of the surface. This uses lighting properties and indicates which parts are dark and which are light on a texture, making it look more geometrically complex because of light refraction. 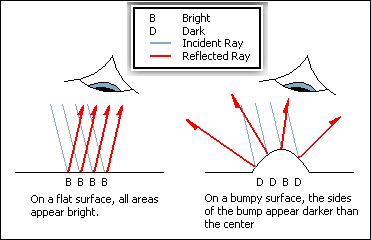 Surfaces that should have a patterned roughness are good candidates for bump mapping. Examples include strawberries, oranges, stucco, wood, water, etc. A bump map is an array of values that represent an object's height variations on a small scale. A custom renderer is used to map these height values into changes in the local surface normal. A normal is the perpendicular vector to a plane -- 90 degrees from the plane. These normals are combined with the surface normal, and the results are used to evaluate the lighting equation at each pixel.  Emboss Bump Mapping The first type (and the most common type) of bump mapping is emboss bump mapping. The technique described here uses texture maps to generate bump mapping effects without requiring a custom renderer. This multipass algorithm is an extension and refinement of texture embossing. 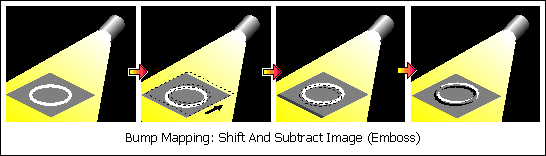 -- Render the image as a texture. -- Shift the texture coordinates at the vertices. -- Re-render the image as a texture, subtracting from the first image. What emboss bump mapping does is duplicate the first texture, shift it over to the desired amount of bump, darken the texture underneath, cut out the appropriate shape from the texture on top, and blend the two textures into one. This is called a two-pass emboss bump mapping because it requires two textures. |
||
|
| |||
|---|---|---|---|