Air Flow Guide
Posted: November 27, 2000
Written by: Tuan "Solace" Nguyen
Introduction
We here at Tweak3D are always looking for new ways to get the most out of our machines. And if we can’t do it one way, we’re going to look for another. We always feel that our machines can run a little faster without actually buying anything extra. Whether it’s a hardware tweak or a software tweak, any sort of tweak will surely speed up your machine just a bit.
But let’s say you have a brand new gigahertz machine fresh out-of-the-box, why would you even bother tweaking it? The answer is that every machine has a latent potential to go further and run faster. Think of tweaking and souping up your machine like a hot rodder souping up a car. Even though it may be fast, there is always that feeling that it can go even faster.
The pride and joy of tweaking and modifying your computer is a feeling you wouldn’t know unless you tried it.
That said, today I’m going to touch down on a hot subject -- heatsinks and fans -- and how they affect your computer.
In the early days of speedy 486 computing, big heatsink and fan combos weren’t necessary, and neither was a bare heatsink. Things just weren’t hot enough for anyone or any company to put extra cooling measures inside a computer. But things have changed. Now we’re in the hundreds of megahertz and gigahertz range, and there’s nothing more important than cooling your computer. Sure, a component may be tested to withstand extreme temperatures that your bedroom may never reach, but common sense says constant operation at extreme temperatures isn’t such a wonderful idea.
In fact, electricity flows better in a cool environment. So if you’re thinking of tweaking your machine, make sure it starts off chilled. There is no point tweaking other things if your computer is crashing and BSODing all over the place, spilling its guts in the form of Illegal Operations and Page Faults. You must always start at the root, the most basic tweaking measure, even before overclocking. You must ventilate your machine.
Heat
Everything inside your computer generates heat. Whether it’s the motherboard, hard drive, RAM modules, or your processor -- it just depends on the degree. The most effective way to make sure your machine is running cool is to make sure the ambient temperature is cooler than its internal temperature. This means making sure the air in and around your computer is at room temperature or cooler.
Overheating is the worst cause of electronic component death. You may also want to keep in mind that repeated cooling and heating of any component is bad. When something heats up it expands, and it will contract when it cools down. If this process is always repeated, you risk cracking the device. This is why I personally always keep my computer running. All the components are in a constant, and don’t go through temperature changes often. However, I do let the hard drives spin down after a certain amount of time.
Case Ventilation
The first step in tweaking you system is to make sure you have sufficient airflow through your case. This means having a power supply with a working fan. Some people don’t even know that the fan inside their power supply is cooked until it’s too late.
However, don’t fall into the misconception that having more fans is better. Sometimes having just 2 fans is better than having 10 fans blowing and sucking all over the place -- please, let’s stay technical here huh? :) The best setup for a case is having cool air come in from the front and hot air expel from the back.
I drew some diagrams to show you some conventional and good case designs.
Sometimes Conventions Needs Innovation
Above is a diagram of a typically ventilated case enclosure. There are two fans in this system -- one at the front that draws cool air into the system and one at the back (inside the power supply) that expels hot air out. This system works best if there aren’t any dangling cables and wires inside the system. The worst cause of bad airflow is poorly laid out ribbon cables. If you’re going to use this layout, you have to make sure that your ribbons are either neatly folded along the case or spliced. If you’re using standard 40wire IDE cables or a 50wire SCSI-2 cable, then you can go ahead and splice your cable.
To splice your cables, you’ll need a sharp blade, an X-acto knife of some sort. Then you carefully cut the wires. Make sure you don’t start sliding into the wires themselves or you’ll destroy your cable. Once you’re done, you should have a nice cable that can be twist tied or taped into a tubular wire.
Once you’ve done that, the cables will no longer block airflow like they did before and you can rest assured that you’ve tweaked your cables nicely. Even the Tweak3D staff would be proud!
The 2 Fan design, while common, doesn’t always give the best airflow. The red circles in the diagram above indicate areas where there air isn’t circulating properly. The lower circle is where all your expansion cards lie. They interrupt the airflow because there aren’t any fans actually blowing onto the cards and the cards themselves are obstacles. Let’s take a look at another design.
3 Fan Design
Adequate Cooling with One Dead Spot
Here is another design that is becoming popular among case manufacturers. This design helps cool off the drives and help pull air through the case better. All the capacitors and transformers that are inside the power supply cause the fan to do a poor job of moving hot air out of the case. In this case, it’s better to have negative pressure inside the case (caused by 2 outs and 1 in) so that cool air from the outside is always moving in from the front. There’s still the issue of our AGP and PCI cards not getting the freeze treatment though.
Let’s take a look at another popular case setup.
2 Fans + CPU Exhaust

Too Many Dead Spots
This type of case is also very popular. Taking a first glance inside the case you’ll be delighted to see a fan right where the CPU is located. But this is usually a problem in disguise. Why so, you ask? Well, let’s take a moment to remember that there is also a HSF (heatsink fan combo) on your CPU. The fan is likely to be blowing down onto the heatsink. This means that there is negative pressure above the heatsink because it is drawing air. Since our exhaust fan is blowing air out of the case, it too is drawing air from the same area. If our exhaust fan is drawing air and our CPU fan is also drawing air, then there’s going to be turbulence -- a bad situation for smooth airflow. We’ll touch this subject in a bit.
It’s about time we get rid of all the red circles.
Tweak3D’s Design
Our Custom Rig
Above you see a case that is well ventilated. We’ve covered all major areas of the case and made sure that there is cool air going to all areas of the case while hot air is taken out. There are four fans blowing air out and six fans sucking air in. You may now be asking if this is bad since there more fans sucking in then there are blowing out. Well, if you take a look at the hard drive fans, they are in close quarters and don’t really have room to move large amounts of air, therefore the power of the four hard drive fans approximately equal that of two fans. Two (effectively) fans sucking in at the top and two at the bottom give a well-rounded and balanced airflow since there are four fans expelling air at the back.
Right now you may be wondering about our CPU exhaust fan and its function and why we still have it sucking air out. Let’s take a look at our CPU fan shall we?
The CPU Heatsink
A Slot1 Alpha P3125 Heatsink
This is likely the most important non-electric component inside the system. Without it, your high speed CPU would overheat in a matter of seconds flushing your investment down the hole in the process. You don’t want something like that to happen. That said -- we go in search of the perfect heatsink.
With a good heatsink and fan combo, we’ll be able to tweak our processor to its limits without worrying about a critical meltdown. I know you love to overclock everything in your computer so I’ll make sure you’ll be well prepared.
A good heatsink must be able to take heat away quickly from the processor and dissipate it into the air (or water, but we’ll stick to air cooling for this article). It also has to be large enough to support a decent size fan -- I suggest a 60mm fan; anything smaller and it just doesn’t move enough air.
Material
A typical heatsink is made out of Aluminum 6030, which conducts heat very well and is hard enough to withstand deformation. However, some manufacturers have heatsinks that are either made out of copper or have a copper-embedded base.
Copper, while being better at conducting heat than aluminum, does have its disadvantages. It’s harder to manufacture, it’s soft, and it’s heavier than aluminum. Because it is so soft, grills and fins on a copper heatsink can’t be cut as close as those on an aluminum heatsink. Because of this, a well-known manufacturer named Alpha Novatech produces aluminum heatsinks with copper embedded in the base. This helps take heat away from the processor fast. These days, with flip-chip processors (processor cure on top), it is important to remove the heat from the core as fast as possible since the contact area is small.
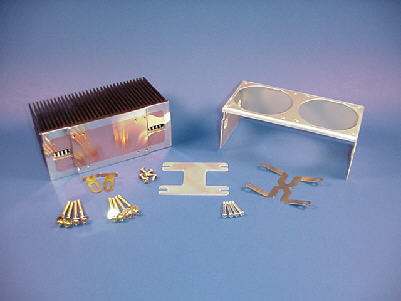
Fitting and Modifying
Since high-speed processors these days are socket based, it’s ironic that they are usually packaged with a heatsink half the size of slower slot-based processors. You’d figure that manufacturers would produce heatsinks at least the same size as the slots heatsinks, but they don’t. I recommend that if your motherboard has the room, and you have the tools, go out and get a slot heatsink, trim it down a bit and modify the clip to fit on a socket based motherboard. As a matter of fact, this is exactly what I did with my heatsink. My main system uses an Asus A7V motherboard -- which has an unusual amount of heatsink room, so I decided to take advantage of it. I purchased the Alpha P3125 and modified it to fit perfectly on the motherboard. A clip from another heatsink was used to attach it to the socket. This heatsink accommodates two 60mm fans, more airflow than you’ll ever need. Let’s get on with some fan fare.
CPU Fan Placement
Knowing where to place fans inside your computer is almost as important as having a case to put them in. The same thing goes for a CPU fan. You really shouldn’t just slap a fan on a heatsink and expect good performance. The following is a diagram showing a typical heatsink design.
A Standard HSF (Heatsink/Fan Combo)
The red oval indicates an area where there is low air circulation. You maybe asking, “well shouldn’t there be air moving since the fan is right on top of that area?” The answer is no. This is because there isn’t any airflow in the center of the fan. Think of a tornado. At the center of the tornado, called the eye, the air is hardly moving. You can actually stand inside the eye and be fine. This is the case for a fan. All of the air movement occurs in a ring surrounding the center.
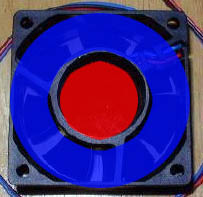
Airflow Layout
Above is a picture of a typical fan. The red spot is where the dead spot is. The air in this area is relatively inert, moving very little. The area in blue is where the action really occurs. Now, you may have noticed that people have their fans centered directly over their CPU heatsinks. If the CPU core is directly in the center of the heatsink, it really is ineffective to have a dead spot directly above that area. For this reason, you should try to position your fans slightly off center so that the fins of the fan affect the center of the heatsink -- where the most heat is.
If you’re using a Slot heatsink, then I suggest having two fans. This way, you get the best airflow where it’s most needed.
Our Custom HSF
Here’s my custom Alpha/Delta heatsink fan combination. This thing actually fits on the Asus A7V, which is a Socket A Athlon motherboard.
Definitely a Monster
I have two 60mm on top of the heatsink; one taking cool air in and another blowing hot air out. You can think of it as a mini wind tunnel. This way, I have a one directional airflow that’s constant.
A Side Shot
The masking tape actually reaches to the bottom of the heatsink instead of leaving a gap that’s pictured above. This way, I make sure that air flows into and out of the heatsink in one swooping motion instead of leaking all over the place. You can also have both fans sucking air out from the heatsink and leaving a gap in the masking tape like I pictured above. All my heatsinks are tapped in this manner. Doing this actually helps move air through the heatsink. This is because all the air must now be sucked from the bottom of the heatsink where there is most heat. Air cannot come in from the top part of the heatsink because it’s sealed and therefore must enter from the bottom and go through the top -- carrying with it, all the heat from the CPU.
To Suck or to Blow
A lot of people have been asking whether it’s better to have the fan blow onto the heatsink or to suck air from it. I generally tell them to suck it, heh, but it depends on your setup. If you want the fan to pull air from the heatsink, then you must make sure that the hot air is effectively taken away. Make sure there is enough cool air getting into the case and the hot air out.
I’ve set all my CPU fans inside my computers to pull air away from the heatsinks. I find that doing this generally lowers the temperature by a few degrees. Your results may vary so figure out what type of setup works for your computer.
Conclusion
In this article I’ve outlined a few steps you can take to make sure your computer performs at its peak. Making sure every component runs cool ensures that your computer will last and perform at its best. When you try to tweak something, take a look around and see if there is anything you can do to make your sure your setup will perform well at its roots. Having a hot system and trying to overclock it at the same time is not a good idea. Start from the bottom and work your way up. The lowest level of tweaking is cooling. Middle level tweaking is optimizing your hardware using the BIOS and or switches or jumpers on your motherboard. Overclocking your graphics card, processor or anything else is also considered a mid level tweak. High level tweaking deals with the software you’re running. Optimizing your operating system, software and games and making sure that they take full advantage of your lower level tweaks is a high level tweak.
I’ve seen some people spend hours and days fine tuning their hardware but their operating system is a mess. They have unnecessary utilities and monitoring tools running in the background. These utilities take a toll on CPU cycles and ultimately slow down your souped up computer.
To make a long story short, cooling your computer well is the most basic tweak you can do. I can’t stress that enough. And if you didn’t realize that before, you will if you try it. It’s a lot of fun and when you try it, you won’t want to stop doing it. Tweaking and upgrading is like a sport. Do it, have fun doing it, and learn from it.
Once again, thanks for reading. I hope you’ve learned a few tips from this guide and more are sure to come so stay tuned. If you have any questions or comments, feel free to email me or you can always catch me in channel #tweak3d on any Undernet server, IRC.
Want to return to the normal guide? Click here!
All Content Copyright ©Dan Kennedy; 1998-2000